

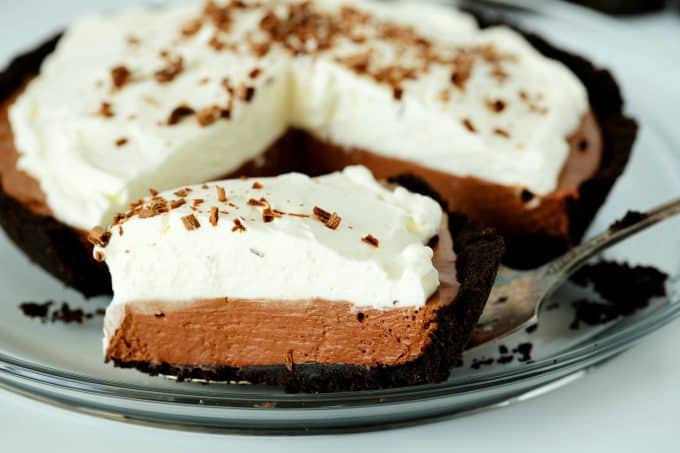
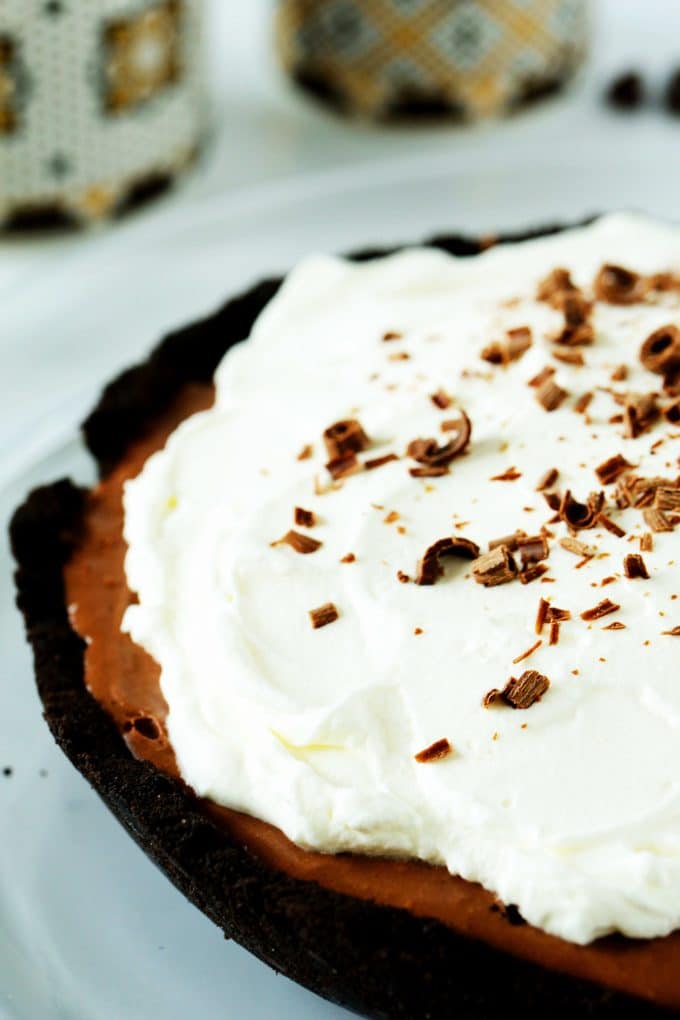
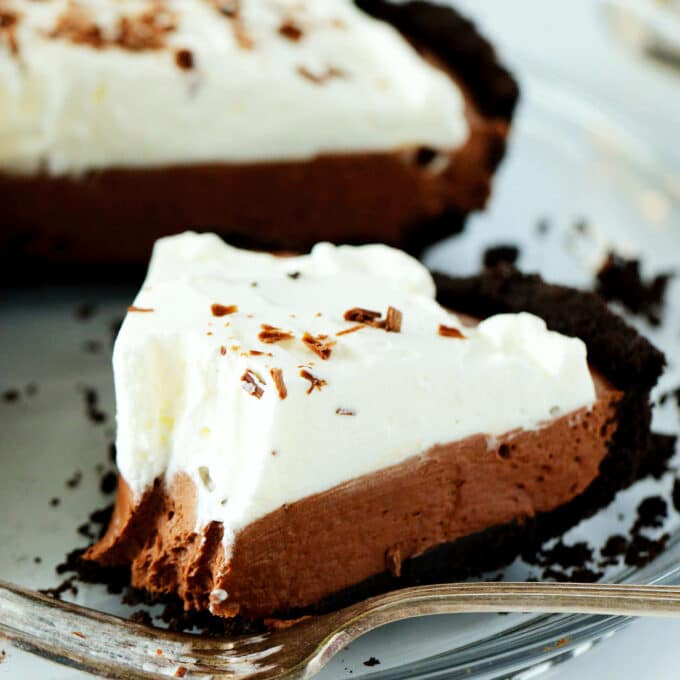
You'd be hard-pressed to find a chocolate pie this easy and this delicious anywhere else. This No Bake Chocolate Pie is rich and creamy with loads upon loads of chocolate flavor. It's made extra decadent thanks to a dreamy whipped cream topping and a gorgeously thick Oreo crust!
There's no pudding mix, no chopping, and best of all, no stovetop work whatsoever! It's a chocolate lover's dream come true, and it comes without all the fuss that typically comes along with pudding pies. Yes, please.
With only 15 minutes of hands-on prep time, this Chocolate Cream Pie is going to be your new favorite make-ahead party dessert! Both the kids and the grown-ups go wild for it.
Love an Oreo crust? Bookmark this No Bake Oreo Cheesecake for your next baking extravaganza!
HOW TO MAKE NO BAKE CHOCOLATE PIE
There are two things you'll need to determine before you begin making your No Bake Chocolate Pie!
- When do I want to serve it?
- What do I want to serve it on?
No bake pies take a minimum of four hours to set up, making them ideal make-ahead dessert recipes! However, if you are planning to serve it the day you make it, you'll need to be sure you have set aside the proper amount of time for it to chill through. Otherwise, it will not slice beautifully!
Secondly, will you be serving your pie out of the pie dish itself, or would you like to serve it on a serving platter or cake stand? If you want to transfer your pie to a serving dish, you'll need to line the 9" pie dish with a double layer of plastic wrap. Be sure to leave some overhang off the sides so that you can easily lift it out of the dish after it has properly chilled.
Once you have these two decisions under your belt, it's time to make the pie! This No Bake Chocolate Pie comes together entirely from scratch in four simple parts:
- Make the Oreo Crust.
- Make the Chocolate Cream Pie Filling.
- Make the Whipped Cream Topping.
- Chill.
PART 1: MAKE THE OREO CRUST

The easiest way to make an Oreo crust from scratch is with the food processor. To make the crust, simply add whole Oreo cookies (with the filling intact) to the bowl of a food processor fitted with a blade attachment. Then, process or pulse until the cookies have turned to crumbs. Drizzle in the melted butter and pulse again, just until it is evenly distributed.
Add the crumbs to the pie dish and use the bottom of a measuring cup to pack it down, across the bottom and up the sides. And, that's it -- the crust for your No Bake Chocolate Pie is done! If you are on the lookout for more No Bake Recipes, we've got so many delicious options for you!
NO FOOD PROCESSOR? NO PROBLEM.
If you don't have a food processor, ready the rolling pin, a plastic bag, and a mixing bowl! Add the Oreo cookies to a gallon-sized plastic zip-top bag, seal, and crush until they have turned to crumbs. Then, transfer the crumbs to a medium-sized mixing bowl, add the butter and stir to combine.
PART 2: MAKE THE NO BAKE CHOCOLATE PIE FILLING

- Melt Chocolate Chips With Whipping Cream In Microwave
- Allow To Cool To Room Temperature
- Whip With Condensed Milk, Vanilla, and Salt
The filling for this No Bake Chocolate Pie begins with chocolate chips and heavy whipping cream. You'll combine the two in a microwave-safe bowl and heat at 30-second intervals, stirring after each stint in the microwave. The chips should be completely melted after about a total of 2 minutes.

Set the mixture aside to come and wait for it to cool down to room temperature. Note: this step is important. You need the chocolate/cream mixture to cool off before you being whipping it. Whipping hot cream is not very effective, and you'll end up spending a good deal of wasted time trying to get it to double in volume if it's warm. Patience is truly a virtue here. Wait until the mix is no longer warm to the touch before you begin the whipping process.
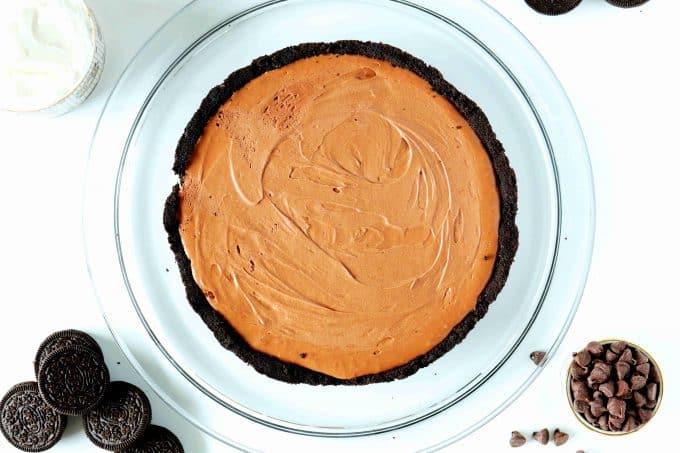
Once the chocolate mixture has cooled, transfer it to the bowl of the stand mixer and add the sweetened condensed milk, vanilla, and salt. If you don't have a stand mixer, use a large bowl and a handheld mixer. Mix on medium-high speed for about 3 to 4 minutes, until the mixture has more than doubled in size. It should resemble a fluffy chocolate frosting.
Transfer the filling to the Oreo crust and move on to making the whipped cream topping!
PART 3: MAKE THE WHIPPED CREAM TOPPING
If you're new to making homemade whipped cream, rest assured -- it's worth it and it's really easy. Plus, provides the perfect balance to a rich, chocolatey No Bake Chocolate Pie!
Just add cream, powdered sugar, vanilla, and salt to the mixing bowl of a stand mixer fitted with a whisk attachment. If you do not have a stand mixer, again, use a large bowl and a handheld mixer.

Mix on medium-high speed until the cream has reached stiff peaks, which means it will hold its shape when the whisk attachment or beaters are turned upside down.
PART 4: TOP AND CHILL
MORE NO-BAKE DESSERTS YOU'LL LOVE!
HOW TO MAKE A SHAVED CHOCOLATE GARNISH
The easiest route to making chocolate curls for a pie garnish is with a Hershey's bar and a vegetable peeler. Because Hershey's chocolate bars are so soft, they are easy to work with than most others. Hold the bar firmly in your hand and scrape the blade of your vegetable peeler lengthwise, along its edge.
HOW TO STORE NO BAKE CHOCOLATE PIE
Store this pie loosely covered with plastic wrap in the refrigerator for up to 3 to 4 days. Freezing cream pies is not recommended, but if you need to do so, here are instructions, if needed.
Are you a chocolate fanatic? Browse our Chocolate Desserts and add a few to your "must-make" list!
4 TIPS FOR MAKING NO BAKE CHOCOLATE PIE
- Taste your chocolate chips! This will be the predominant flavor of the pie. If you don't like the way your chocolate chips taste on their own, you won't care for No Bake Chocolate Pie very much!
- Let your melted chocolate mixture cool before whisking. It will take close to 10 minutes of whisking before the mixture doubles in size otherwise!
- Make sure your cream for the pie topping is whipped to stiff peaks. It will stay good longer this way.
- The chill time is very important in this recipe and is needed in order for your pie to set up. If you want your pie to slice properly, be sure to give it a minimum of four hours in the refrigerator.
7 MORE PIE RECIPES YOU’LL LOVE
- Apple Pie
- Pumpkin Pie
- Easy Pecan Pie
- Apple Crisp Pie
- Sweet Potato Pie
- Chocolate Chess Pie
- Chocolate Pudding Pie
- Southern Buttermilk Pie

No Bake Chocolate Pie
Ingredients
FOR THE OREO CRUST:
- 26 Oreo Sandwich Cookies with filling intact
- 6 tablespoons unsalted butter melted
FOR THE CHOCOLATE PIE FILLING:
- 1 ½ cup (about 9 ounces) high-quality semi-sweet chocolate chips
- 1 cup heavy whipping cream
- ⅓ cup sweetened condensed milk
- 2 teaspoons pure vanilla extract
- ¼ teaspoon salt
FOR THE WHIPPED CREAM TOPPING:
- 1 cup heavy whipping cream
- ¼ cup powdered sugar
- 1 teaspoon pure vanilla extract
- Generous pinch of salt
- Chocolate curls for garnishing
Instructions
- If desired, double line a 9" pie dish with plastic wrap, leaving an overhang off the sides so you can easily remove it from the dish and transfer it to a serving platter.
MAKE THE OREO CRUST:
- Add the Oreos to the bowl of a food processor fitted with the blade attachment. Process until fine crumbs appear.
- Remove the feed tube, and with the processor running, slowly pour in the butter. Continue processing until the mixture appears evenly moistened. See the notes below if you do not have a food processor.
- Transfer the contents of the food processor to a 9" pie dish and use the flat bottom of a measuring cup to compact it on the bottom and up the sides of the pie dish. Transfer to the refrigerator to chill until ready to use.
MAKE THE CHOCOLATE FILLING:
- Add the chocolate chips and 1 cup of heavy whipping cream to a microwave-safe bowl. Microwave at 30-second intervals, stirring after each stint in the microwave. This should take about 2 minutes total. Set the mixture aside to cool to room temperature.
- Once the chocolate mixture has cooled to room temperature and is no longer warm to the touch, transfer it to the bowl of a stand mixer fitted with a whisk attachment. If you do not have a stand mixer, use a large mixing bowl and a handheld mixer.
- Add in the sweetened condensed milk, vanilla extract, and salt and whisk for 3-4 minutes on medium-high speed. The filling is ready once it has the consitency of fluffy icing and has more than doubled in size.
- Transfer the filling to the prepared Oreo crust and smooth over the top.
MAKE THE WHIPPED CREAM:
- Add whipping cream, powdered sugar, vanilla, and salt to the clean bowl of a stand mixer fitted with a whisk attachment.
- Mix on high for 2-3 minutes, until the cream has thickened and holds its shape when the whisk attachment is turned upside down. If you do not have a stand mixer, use a large mixing bowl and a handheld mixer.
TOP AND CHILL:
- Spread the whipped cream topping over the chocolate filling and garnish with chocolate curls, if desired.
- Chill for at least 4 hours (or until set), but preferably overnight.
Notes
Nutrition

nonna box says
I made it for my son's birthday yesterday and it was a success! He loves creamy chocolate, this was perfect for him. Thank you! Pinned it for later too 🙂