If you loved Little Debbie Oatmeal Creme Pies as a kid, there's a real good chance this recipe is going to send you into a straight-up baking frenzy. These homemade Oatmeal Cream Pies are so much better in every single way, and might I add, pre-tty addictive as well.

Sure, ripping up that little plastic cookie package was satisfying and exciting, but it doesn't compare to the smell of oatmeal cookies wafting from your oven. Plus, when it comes to the homemade rendition, you can actually pronounce all of the ingredients - That's a win-win!
One bite of these, and you'll never go back to the storebought equivalent again. This nostalgic favorite is so easy to make at home. The cookie is soft and chewy, and you won't be able to resist that creamy layer of vanilla marshmallow buttercream filling. You will be forever changed. If baking from scratch just became your new favorite, we have tons of decadent baking recipes for you to choose from!

Share with a friend for a blast from the past or whip up a batch for parties or gift-giving. These are especially delightful around the holidays! And for even more cookie jar inspiration, check out our pumpkin spice cookies, chewy peanut butter cookies, or ginger molasses cookies.
A BRIEF HISTORY OF OATMEAL CREAM PIES
Did you know that Oatmeal Cream Pies were the very first treat Little Debbie ever created? It's true! When the company was founded in 1960 this irresistible little cookie sandwich was the first thing to hit grocery store shelves.
In the 10 months following the debut of Oatmeal Cream Pies, more than 14 million cakes were sold.
I'm pretty sure that qualifies it as a classic, but qualifications aside, it will always be a classic to those of us who remember the thrill of getting to add a box of these to the shopping cart.

HOW TO MAKE OATMEAL CREAM PIES
This soft and chewy Oatmeal Cream Pie recipe is super easy and literally just made up of 2 components -- the cookies and the cream filling! We will walk you through every step but don't worry, there isn't anything too complicated on the horizon. You've got this!
MAKE THE COOKIES
Just like most cookie recipes, this cookie starts by preheating your oven and prepping your baking pan! Get your oven preheating to 350°F and have ready a baking sheet lined with either parchment paper or a silicone baking mat. Not only do silicone baking mats make it easier for you to remove your cookies from the pan, but it also helps to keep them from browning too quickly on the bottom.
Next, we're going to move it on over to the food processor -- this is the secret to super soft oatmeal cookies, by the way -- and you'll also need to have your oats in hand.
For this recipe, you definitely want to use quick oats rather than old-fashioned rolled oats. Quick oats are steamed, rolled into thin flakes, and cut into small pieces. Because of this, they absorb liquid faster than rolled oats and will lend a softer texture to your Oatmeal Cream Pies. Subbing rolled oats in this particular cookie recipe would negatively affect the texture of the cookie and offset the bake time.
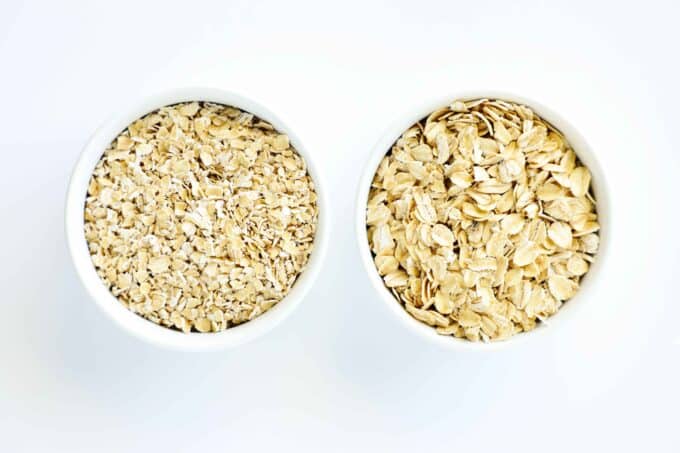
To mix up the dry ingredients, add your oats, all-purpose flour, cornstarch, baking soda, sea salt, and cinnamon to the bowl of a food processor fitted with a blade attachment and process until the oats are fine crumbs.

Once you've got your oats broken up and the dry ingredients mixed, you'll move on over to the wet ingredients. Grab yourself a large mixing bowl and add unsalted butter, light brown sugar, and granulated sugar. Use a handheld mixer to beat these ingredients together on medium-high speed for about 3 minutes.

It is very important for this recipe that your butter is at room temperature or it will not mix properly with your sugar.
Once the butter and the sugar mix is appearing light and fluffy, you'll add in your eggs one at a time, mixing well after each addition. Lastly, mix in the molasses and vanilla extract.

So that's it for your wet ingredients; time to bring this dough to completion! Grab your dry ingredients and add them to the bowl of wet ingredients. Use your handheld mixer to mix the dough on low speed until completely combined. Your Oatmeal Cream Pies are coming together!

Add generous tablespoons of dough to the prepared baking sheet, spacing each cookie about 2" apart. You'll find a cookie scoop extremely helpful when it comes to making sandwich cookies, as it keeps each and every cookie one uniform size.
Bake the cookies for 10-12 minutes, and as soon as you see the edges tinging golden brown, remove them from the oven and set them aside to cool completely.
MAKE THE FILLING
The filling for these Oatmeal Cream Pies couldn't be easier to make. But, one important thing to note is that you absolutely cannot put frosting on a warm cookie. Keep in mind a large component of frosting is butter, and butter melts when it is warm! Your cookies must be cool before adding the center!
To make the marshmallow buttercream, add room-temperature butter, marshmallow fluff, powdered sugar, vanilla extract, and salt to the medium-sized mixing bowl. Note, if your butter is too cold, it will not mix smoothly with the other ingredients.
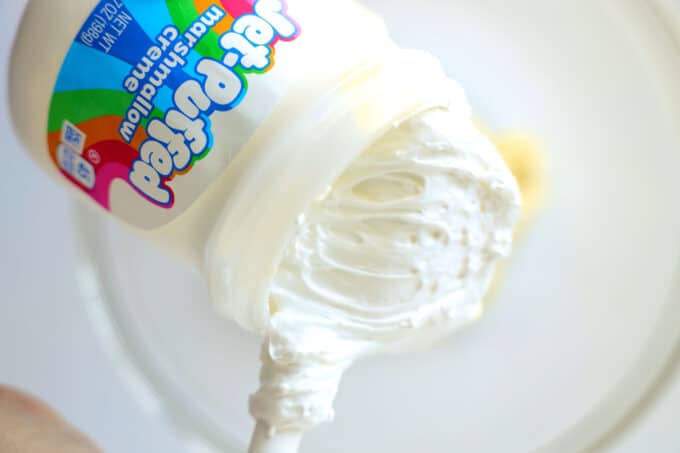
Begin mixing with a handheld mixer on low speed -- you definitely don't want powdered sugar flying everywhere! As soon as you see the mixture start to come together, you can increase the speed to medium-high and mix until completely smooth.

ASSEMBLY TIME
Once your cookies have completely cooled and your marshmallow buttercream is looking smooth and creamy, you can begin assembling your Oatmeal Cream Pies! Turn half of your cookies bottom side up and add a generous tablespoon worth of the filling to the center of the cookies.

Again, for a more uniform look, you can use a cookie scoop to add the filling to the center of your cookies. Place another cookie over the filling and gently press down until the filling reaches the edges.
Allow the cookies to set at room temperature for 1-2 hours more. The setting time is necessary to keep your cookies intact and prevent them from wiggling or sliding around when you take a bite. It'll be hard to wait, but trust me when I say this is a cookie totally worth waiting for.
HOW TO STORE HOMEMADE OATMEAL CREAM PIES
Your Oatmeal Cream Pies should maintain their amazing flavor and texture for 3-4 days if stored properly in an airtight container, at room temperature.
If you're wanting to make these ahead of time to pull out at a later date, we've got you covered there too with some easy freezing instructions.
P.S. THEY FREEZE BEAUTIFULLY!
What could be better than a delicious Oatmeal Cream Pie with perfect texture? One that you get to eat without having to cook that day! Sort of that whole Thanksgiving leftovers are better the next day thing. Cause you can enjoy it without having to fuss with cooking, your past self already took care of that for you!
To freeze Oatmeal Cream Pies, simply allow them to cool completely to room temperature, and then gently pack them into either an airtight container or a freezer-safe, gallon-size, zip-top bag, before placing them into the freezer.
If you decide to go the airtight container route, try to find one that they will fit snugly in, so that they won't be sliding all around in there. Also, feel free to place a piece of wax paper in between each layer of cookies to avoid them sticking together.

6 MORE COOKIE RECIPES YOU’LL LOVE
- Oatmeal Cranberry Cookie
- Chocolate Chip Sandwich Cookies
- Old Fashioned Oatmeal Cookie
- Iced Oatmeal Cookies
- Texas Sheet Cake Cookies
- Haystack Cookies

Oatmeal Cranberry Cookies
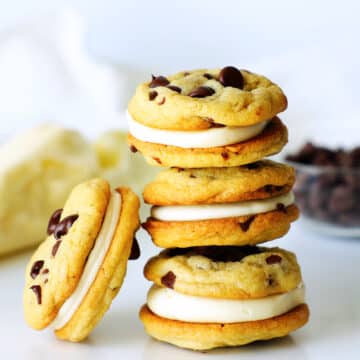
Chocolate Chip Sandwich Cookies

Old-Fashioned Oatmeal Cookies

Iced Oatmeal Cookies

Texas Sheet Cake Cookies

Haystack Cookies

Oatmeal Cream Pies
Ingredients
FOR THE COOKIES:
- 2 cups quick cooking oats
- 1 ½ cups all-purpose flour
- 2 teaspoons corn starch
- 1 teaspoon baking soda
- ¾ teaspoon fine sea salt
- ¼ teaspoon ground cinnamon
- 1 cup room temperature, unsalted butter
- ½ cup light brown sugar, packed
- ½ cup granulated sugar
- 2 large eggs
- 2 tablespoons molasses
- 1 teaspoon pure vanilla extract
FOR THE FILLING:
- ½ cup room temperature, unsalted butter
- 7 ounces marshmallow fluff
- 2 cups powdered sugar
- 1 teaspoon pure vanilla extract
- Generous pinch of fine sea salt
Instructions
MAKE THE COOKIES:
- Preheat the oven to 350°F and have ready a baking sheet lined with either parchment paper or a silicone baking mat.
- Add oats, flour, cornstarch, baking soda, salt, and cinnamon to a food processor and pulse until oats are fine crumbs. Set aside.
- Add butter, brown sugar, and granulated sugar to a large bowl and use a handheld mixer to mix on medium-high speed for about 3 minutes or until light and fluffy. Add eggs, one at a time, mixing after each addition. Next, add the molasses and vanilla. Mix once more.
- Add dry ingredients and mix on low until combined.
- Drop generous tablespoon-sized batter on the prepared baking sheet 2” apart, and bake for 10-12 minutes. Remove the cookies from the oven, and after about 10 minutes, transfer them over to a cooling rack to cool completely.
MAKE THE FILLING:
- Add the butter, marshmallow fluff, powdered sugar, vanilla extract, and sea salt to a medium-sized mixing bowl and begin mixing on low speed. When the ingredients appear mostly combined, increase the speed to medium-high and mix until smooth.
ASSEMBLE THE COOKIES:
- Turn half of the cookies bottom-side up and add a generous tablespoon of filling to the center. Top with the remaining cookies and press down gently until the filling reaches the edges of the cookies.
- Allow to set for 1-2 hours, serve, and enjoy!
Nutrition

Source: Rolled Oats vs. Quick Oats, Little Debbie Brand History
Leave a Reply