
These Painted Cookies are so easy to make and by far the easiest way to decorate sugar cookies! No piping skills are necessary.
The color possibilities and design options are limitless, far from boring--and your cookie flavors can be exciting too! Our watercolor cookie technique works for literally any shaped cookie, for any occasion.

When I ran my at-home bakery, people went wild over these cookies. They sold out every Christmas. My sugar cookies with a homemade cookie frosting were also a hit! Try that recipe next if you're in cookie decorating mode, or for more painted cookie options, consider baking up a batch of gingerbread cookies or these adorable cut-out reindeer cookies.

Table of Contents
Planning for Painted Cookies
My kids and I have painted sugar cookies every Christmas for as long as I can remember. I like to keep my cookies extra simple with just the stroke of a paintbrush and a few colors, but my children often go the extra mile painting a nativity scene, Santa Clause, bursting stars, ornaments, and more.
The entire cookie process can be as homemade or store-bought as you'd like. Either way, you'll need to plan ahead.
Before you can set those artistic juices flow, know that for most sugar cookie recipes, you'll need to:
- Make the dough.
- Chill the dough.
- Roll the dough.
- Cut out the cookies.
- Bake the cookies.
- Let the cookies cool.
- Ice the cookies.
- Let the icing set overnight.
If that feels like too much of a process for you, know that royal icing can be applied to scoop-and-bake style cookies like these soft sugar cookies or lemon cookies. The only downside is the tops of the cookies aren't perfectly flat, and you might see some imperfections once your icing sets. But, if you're just in it for the fun, this shouldn't matter too much.
You can make or purchase royal icing from craft stores or even your local grocery store. If you need a quick-fix decorative sugar cookie, you may want to switch gears to this quick-set sugar cookie icing recipe, although I don't recommend painting on it!

How to Make Edible Paint
To make edible paint for cookies, all you have to do is add a few drops of food coloring (about a ½ teaspoon) to your dish and combine with a couple drops of either vodka or extract (about a ¼ teaspoon). Mix together, and you've got cookie paint!
However, keep reading on for tips and tools for mixing and application.
Painted Cookie Materials
- Royally Iced Cookies | Make sure your cookies are completely set and dry. Most of the time, I leave my cookies out overnight to set. They are never stale the next day. The icing seals in the moisture.
- Gel Food Coloring | Gel food coloring is bright and vivid, and a little goes a very long way.
- Vodka or Flavored Extract | You can use either vodka or a clear extract, such as lemon or almond extract. I prefer to use vodka to keep the flavor of the cookie as clean as possible. Don't worry; you don't taste the vodka at all. More importantly, the alcohol in the vodka will evaporate as it dries, and you are not at risk of intoxicating any children. You can also use water in a pinch, but vodka or extract is best.
- Small Paint Brushes | Typically, the design detail is going to be pretty small for painted cookies. The smaller the tips of your brushes are, the better.
- Eye Dropper | Trust me, this tool makes it so much easier to add just the right amount of liquid you need...if you don't have a dropper, use a quarter teaspoon measuring spoon and pour slowly or try stopping up the end of a straw and releasing the liquid slowly.
- Paint Holder | You need something to keep those "paints" contained. A ceramic egg holder works great, especially if using multiple colors. You can also use a sturdy disposable plastic plate to house your painting pallet.
- Wax Paper | Large sheets of wax paper will keep your counters mess-free. It definitely helps when decorating with kids.
I also like to use edible glitter to add a little sparkle to my painted cookies. You ready the glitter for painting in the same way as the food coloring--only it may require a touch more liquid before it is "paintable."
Pro tip: It's best to let the first cookie paint layer dry before adding glitter paint!
In the past, I've also used a mix of cocoa powder and water to paint cookies. For this application, you need to mix about 4 teaspoons of cocoa powder with 1 tablespoon of water.
How to Make Painted Sugar Cookies
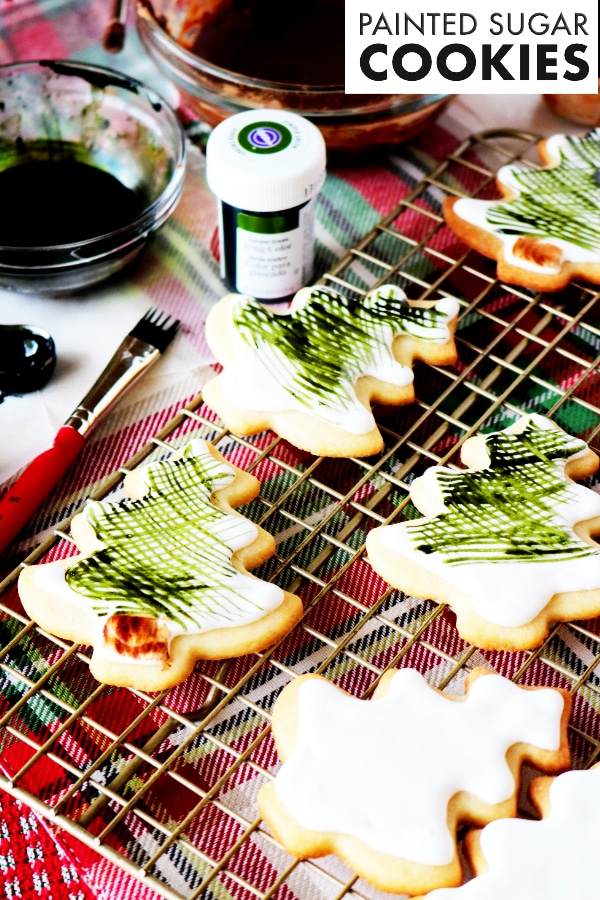
Prepare the Cookies | Lay your cookies out on a sheet of wax paper. The royal icing must be completely hardened and set before painting. For my cookie design, I used Christmas tree-shaped cookies for the trees and circles for the wreaths.
Ready Your Paint | Ready your cookie paint by choosing colors and mixing with either vodka or extract. The colors I chose were a leafy green, teal blue, and brown.
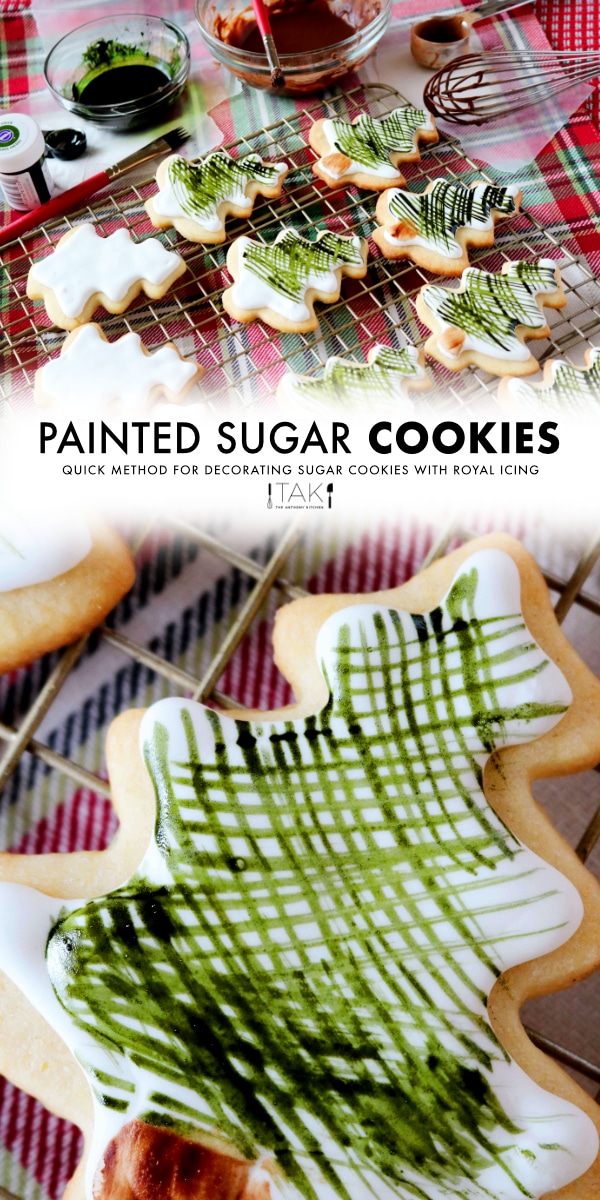
Paint Your Cookies (Tree Design) | For the trees, draw a green line down the cookie and make brush strokes from the line toward the tip of the cookie. Do this until most of the cookie is painted. Then, come in with the teal and make fine brush strokes on top of the green. Lastly, paint the trunk brown.

Once the cookie paint is almost set (after about an hour), if you'd like you can come in with a yellow/gold edible glitter paint and dot lights sporadically on the tree.

Paint Your Cookies (Wreath Design) | For the wreaths, I used the same leafy green and teal. Start with the green and paint a swirly pattern along the edge of the icing. Then, using a finer brush, do the same with the teal.

If you'd like to add red berries once the cookie paint is almost set, you can top the cookies with red edible glitter paint.

Set | Allow the cookies to set for at least 3 hours before storing.

5 More Beautiful Christmas Cookies

Painted Sugar Cookies
Equipment
- Gel food coloring
- Paint brushes with fine tips
- Eye dropper (helps for adding small amounts of liquid to gel food coloring)
- Paint holders (small bowls, sturdy plastic plate, or ceramic egg holder)
- Wax paper for covering and protecting work surface
Ingredients
- 1 batch completely set royally-iced sugar cookies
For Gel Food Coloring Cookie Paint
- ½ teaspoon gel food coloring
- ¼ teaspoon vodka, extra, or water
For Cocoa Powder Cookie Paint
- 4 teaspoons cocoa powder
- 1 tablespoon + ½ teaspoon water
Instructions
Gel Food Coloring Paint
- In a small bowl mix together the gel food coloring and vodka until well combined. Set aside until ready to use.
Cocoa Powder Paint
- In a small bowl mix together the cocoa powder and water until mixture is smooth.
Paint the Cookies
- Prepare your workstation by laying a large sheet of wax paper on the counter, and placing the cookies upon it. Have ready your cookie paint and brushes.
- Before making brush strokes on the cookies, dip the brush into the food coloring mixture and press the brush against the sides of the bowl to rid of any excess liquid.
- Gently make brush strokes on the cookies as desired. Set aside until completely dry, 4-5 hours.
Video
Notes
Nutrition

Annie @ Annie's Noms says
Oh wow these are beautiful!! Now I'm excited for the holidays, these look both delicious and fun to make!
Kelly Anthony says
Thank you, Annie! We love making these!!
Marc @ NoRecipes says
I love the look of these. I noticed the brush has notches cut out of it, do they come that way or did you just trim a flat brush?
Demeter says
This is such a great idea! So much easier and honestly, sounds like more fun in the kitchen to me too! Pinning this for the holidays!
kim says
This is a brilliant idea! My kids would love doing this. We bake Christmas cookies together every year, but we've never done anything like this.
Lauren Vavala @ DeliciousLittleBites says
I can't wait to make Christmas cookies this year - definitely trying this painting technique out with the kids - they will love it!
Sunrita says
This is such a brilliant idea! Thanks for the tip!
Kelly Anthony says
You're welcome, Sunrita!
Gloria says
Those are so pretty. You could almost use them as tree decorations. But that would not be a good thing....my tree would end up with NO decorations. They would all be eaten.
Amanda says
These are adorable! This sounds like such a fun project for the holidays. Pinning! Thanks for sharing.
Stine Mari says
YES! I completely agree, I just am never up for those meticulous decorations - they look good, but I want to eat them asap you know. This is so much better! And they look so pretty too.
Alisa Infanti says
I actually have never tried using royal icing before but these cookies are so beautiful you have inspired me to give it a try.
Nelle Weaver says
Hi Kelly,
These are beautiful! We have an event coming up at church where we will be decorating sugar cookies. I am definitely saving this post as a reference. Thank you!
Nelle
Kelly Anthony says
Thank you so much, Nelle! Have SO much fun at your event! That sounds like a blast 🙂
Chef Mireille says
oh wow these are so pretty - they look so good I wouldn't want to eat them! I would just use them to decorate the table 😉
Nayna Kanabar says
These look adorable and would make great Christmas gifting.You have decorated them with such artistic flair.
Kelly Anthony says
Thank you, Nanya! 🙂
Karyl Henry says
Wow, these are gorgeous! I definitely don't have the patience to do all that, so I would just have to buy some and pretend LOL
Jacqueline Debono says
I've never tried royal icing but these cookies are fabulous. I love the idea of just painting on brushstrokes! They'd make great Christmas tree decorations!
Adriana Lopez Martin says
These are lovely cookies like a work of art. Nice idea to paint them so much fun to make and I bet this will be great to include the complete family in the painting process. Love the holiday season and the cookies!
April says
I've always wondered how it's done. I thought you had to go through training and stuff but your recipe makes it look so simple that I want to try it now! Thank you so much!
Anna Hettick says
What a fun idea!!! I know my kids would love to use this paint to decorate cookies this year!!
Linda says
Oh wow! This is so smart and I love how easy it is to decorate cookies but they all look so nice, charming, and professional. This is it! I'm gonna steal this idea for Christmas 😀
Stephanie Simmons says
These are some gorgeous cookies! I can't wait to try out this technique!
Aditi Bahl says
adorable .my kids will just love them. we have a kids pot luck around christmas. This recipe will be surely welcome by my little reindeers.
Kelly Anthony says
Aw! That's so sweet. Thank you! Hope y'all have a fabulous party!
Sherri says
This looks like a lot of fun for the whole family! I bet my girls would love to try it! Not sure ours would look as beautiful as yours; they are so pretty! 🙂
Kelly Anthony says
It's so much easier than you think! I'm sure they would be gorgeous! And, thank you, Sherri 🙂
Cathleen @ A Taste of Madness says
These cookies are GORGEOUS!! I would love some of these cookies for Christmas!
Kiki Johnson says
These are ADORABLE! Way too pretty to eat myself but the perfect gift for the holidays! You are an artist, mam!
Nicole says
How pretty! These are the perfect Christmas cookie for the holiday! I don't trust my artisitic ability on this one
Kelly Anthony says
Ha! You really don't need any 😉 I have close to none!
Lauren says
I’m always super jealous of the people that can make those super intricate sugar cookies that look like they were decorated by a robot. I just don’t have the patience for that. These are beautiful and look a bit more manageable. I love that the colors are painted on abstractly so you can make each one a little different.
Gina Hoskins says
These are beautiful! I can't wait to make them for my nephew's first Christmas!
Kelly Anthony says
Oh thank you! Merry First Christmas to your nephew! 🙂
Ruchi says
This cookies look so adorable and absolutely gorgeous! I love the deep green color you created- so beautiful!
Sri Mallya says
This is so creative. Looks so pretty too. Perfect holiday treat. I want to try these cookies soon.
Brittany Hollie says
I used to sell sugar cookies for the holidays and honestly wish I had had your recipe for this sugar cookie paint. It would have made my life so much easier!
Kelly Anthony says
Ha! Me too! It's exactly why I resorted to painting! 😉
Michelle says
These look so cute!! What a great idea and so creative. These would be perfect for making with the kids over the holidays.
Michele says
I love cookie decorating, but I have never tried this paint-on method. It's so simple and beautiful! Your instructions make it look so easy too. Looking forward to trying this!
Lathiya says
These cookies looks absolute gorgeous...no doubt about it’s taste..hope I will be brave enough one day to hand paint cookies ..lol
Kelly Anthony says
Thank you, Lathiya! There SO easy! Really, truly a cinch! You'll do great 🙂
Sandi says
How fun to paint cookies! My kids will love this.
Cindy @ The Sweet Nerd says
I love the way you painted the trees - very delicate. Did you cut the brush that way?
Adrianne says
These are so creative, I love them! Painting is so fun and therapeutic a task and to combine food and painting, I think it is win, win!! Cheers, so pinning!
Kelly Anthony says
It really is! Thank you so much, Adrianne!
Pam says
What a great idea! I would have never thought of painting cookies myself. Perfect for any occasion or holiday!
Cindy Gordon says
So beautiful and such a keeper recipe for each year! Bookmarked this to come back too!
Anita @ Daily Cooking Quest says
You are very talented with the painting. But I think this is going to be such a fun project with the kiddos, even if we end up making a mess out of it. 🙂
Eden | Sweet Tea and Thyme says
Love this, not only for Christmas but for any holiday! I'll be using this technique for Easter, the 4th of July, and Halloween, too! It's such a fun project!
Mary Bostow says
Love these cookies! It’s now my daughter and my tradition to make the every Christmas! Best idea Ever!