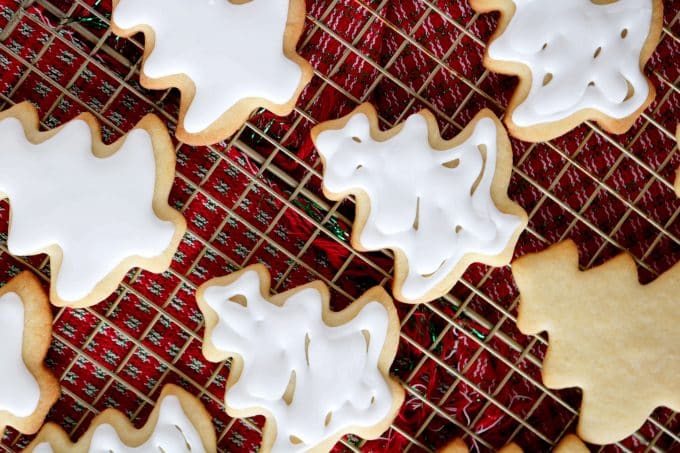
A recipe for royally iced sugar cookies. Plus, tips for working with royal icing and homemade sugar cookie dough.

It seems that Christmas takes forever to return. It’s always been a special and beloved time of year for me, and no season brings greater joy to my heart. Christmas music typically begins beckoning me come September, and friends, you can bet your bottom dollar I’ll be singing along before Thanksgiving. A girl can only resist for so long. At last, Christmas is officially upon us, which also means baking season is in full swing -- batter up.
WHAT MAKES THIS THE BEST SUGAR COOKIE RECIPE EVER
For this cookie, I chose to cut the sugar just a tad. To add more flavor, I used almond extract in addition to vanilla, as well as using a little more salt than you might traditionally see in a sugar cookie recipe. Don’t get me wrong, it still tastes like a sugar cookie and is made using the conventional method, it just has more of a pronounced flavor and isn’t quite as overwhelmingly sweet.

TIPS FOR BAKING SUGAR COOKIES
- Read the recipe, start to finish, before you begin. This includes the list of ingredients.
- When baking, all ingredients should be at room temperature unless otherwise specified.
- Baking is not a process that should feel rushed. Plan for more than enough time to get through the recipe.
- If using intricately shaped cookie cutters, before baking, place the cut-outs in a freezer-safe container layered by sheets of wax paper. Place the container in the freezer for 15-20 minutes until hardened. This will help the cookie to better retain its shape while in the oven.
- Don’t forget to preheat the oven.

TIPS FOR WORKING WITH ROYAL ICING
- Watch the consistency. This is by far the most important detail when it comes to royal icing. You want it to be similar to the consistency of toothpaste, just a tad bit runnier
- The icing should stand up on its own for about 30 seconds after it falls from the beater, it before it fades back into the rest of the icing.
- If royal icing is too thin, beat it on high for an additional 30 seconds or so. If royal icing is too thick, thin it out by adding a teaspoon of warm water, and mixing it once more. Do this until proper consistency is achieved.
- To apply the icing, use a pastry bag fitted with a #5 round tip.
- If you have never worked with a pastry bag and tip before, practice by piping basic shapes in icing onto a sheet of wax paper.
- If you plan to ice lots of cookies, have your work surface ready in advance. I prefer using a few large sheets of wax paper across my kitchen counters. However, if I am planning to work with sprinkles, I use rimmed baking sheets to avoid a mess of sprinkles on the ground.
Whether you are baking this Christmas to hand out a heartfelt gift, using it as a means to spend some quality time with the kids, or just baking because you deserve a treat, nothing quite says “Christmas” like a good old-fashioned sugar cookie. And let me just tell you, I’ve said Christmas in this particular way at least a thousand times and counting. I began The Anthony Kitchen as an at-home bakery just before Christmas, 2010, and this little number has remained a requested favorite. Now, I am gladly passing the recipe on to you. Please, enjoy.
CLICK HERE FOR HOW TO PAINT ROYALLY ICED SUGAR COOKIES!

5 MORE FROSTED DESSERTS YOU'LL LOVE
- Painted Sugar Cookies with Royal Icing are fun and easy to decorate. Pull out the paint brushes and get creative with these sweet (and beautiful) treats!
- Egg Hunt Blondies are an adorable Easter dessert featuring a homemade buttercream frosting made to look like Easter grass and M&M candies made to look like eggs for an egg hunt!
- Homemade Brownies with Strawberry Cream Cheese Icing and Fresh Berries features a light-as-air, whipped strawberry cream cheese frosting, topped with an assortment of beautiful berries. This dessert makes a seriously impressive presentation!
- Halloween Sugar Cookies will show the secret to making your cookies look as though they are suspended in air! Yes, hanging sugar cookies is a real thing, and they’re easier to make than you think! This can be applied to bats and ghosts for Halloween, as well as ornament, shaped sugar cookies with Christmas.
- Christmas Sugar Cookies with Sugar Cookie Icing are as beautiful as they are tasty! Simple, homemade sugar cookies with an easy buttercream frosting for cookies. Plus, how to ice tree and wreath cookies to look like grass.
Royally Iced Sugar Cookies
Ingredients
TAK’s Sugar Cookies:
- 2 ¾ c All-Purpose Flour plus extra for rolling
- 1 tsp Baking Powder
- 1 tsp Fine Sea Salt
- 1 c Unsalted Butter room temperature
- 1 ¼ c Granulated Sugar
- 1 Large Egg
- 3 tbsp Half and Half
- 1 tsp Vanilla Extract
- 1 tsp Almond Extract
Royal Icing:
- 3 c Powdered Sugar
- 2 tbsp Meringue Powder found at specialty craft stores
- 3 oz Warm Water
- 1 tsp Almond Extract
Instructions
Method:
- In a mixing bowl, whisk together flour, baking powder and salt. Set aside until ready to use.
- In the bowl of a stand mixer fitted with a paddle attachment, beat the butter on medium-high speed for 1-2 minutes. Alternatively, use a large mixing bowl and a handheld mixer. Add the sugar and beat on medium-high speed once again until light and fluffy, about 3 minutes. Scrape down the sides of the bowl and mix briefly once again. Add the egg and mix on medium speed until well-incorporated. Add the half and half, along with both the vanilla and almond extract and mix once more.
- Add the flour in 3 separate additions, mixing on low after each addition. Do not over-mix. Divide the dough into two rounds and lay each atop a sheet of plastic wrap. Flatten into a disk shape, wrap and refrigerate until chilled, no less than 1 hour. The dough can be made a day in advance.
- Preheat the oven to 350° and have ready cookie sheets lined with either parchment paper or a Silpat.
- One at a time, lay the disks atop a large floured work surface. Lightly flour each side of the dough round. Begin rolling, from the middle outward in each direction, shifting the dough slightly after each roll to avoid sticking. Do this until the dough is a ¼” in thickness. Cut out dough into desired shapes.
- Transfer the cookies to the prepared cookie sheets, spacing them at least 1 inch apart. Bake until the outer edges are just tinged with golden-brown, about 8-10 minutes. Remove from the oven and allow to cool completely before icing.
For the Royal Icing:
- In the bowl of a stand mixer, combine powdered sugar, meringue powder, water and extract. Begin mixing on low until powdered sugar has absorbed the liquid ingredients, then increase speed to high. Alternatively, use a large mixing bowl and a handheld mixer. Mix for 2-3 minutes or until the icing is the consistency similar to toothpaste.
- To ensure the icing is the right consistency, test it by allowing icing to drip from the paddle attachment or beaters. It should take about 30 seconds before the fallen icing loses its shape and melds into the rest of the icing.
- To apply the icing to the cookie, pipe a line of icing about an eighth of an inch from the edge of the cookie. This is also called outlining. Do not pipe directly on the edge. Then, pipe in a tight and compact zig-zag pattern to fill the inside of the cookie. This is also called flooding.
Nutrition


Maggie Tylinski says
After reading just two cookie icing recipes , I truly appreciate the detail they are written in. To me the more information included in a recipe (ie: consistency of batter, tips,etc.) the more likely have a good result trying a new recipe.
Kelly Anthony says
Thank you, Maggie!